发布时间:2020-09-16
Kendo UI for jQuery R2 2020 SP1试用版下载
Kendo UI目前最新提供Kendo UI for jQuery、Kendo UI for Angular、Kendo UI Support for React和Kendo UI Support for Vue四个控件。Kendo UI for jQuery是创建现代Web应用程序的最完整UI库。
Kendo UI for jQuery通过支持自适应增强功能,可在任何设备上为客户提供一致的体验。
例如,当您在移动设备上过滤或编辑数据时,Kendo UI会在用户的新屏幕中滑动,这与台式机的内联和弹出操作有所不同。
要启用自适应渲染功能,请将mobile属性设置为true或“ phone”:
重要提示:对于移动渲染,我们建议也设置高度选项。 如果不设置明确的高度,则网格的每个视图都可能具有不同的高度。
<div id=”grid”></div>
<script>
$(“#grid”).kendoGrid({
columns: [
{ field: “name” },
{ field: “age” },
{ command: “destroy” }
],
dataSource: [
{ name: “Jane Doe”, age: 30 },
{ name: “John Doe”, age: 33 }
],
filterable: true,
editable: true,
columnMenu: true,
height: 550,
mobile: “phone”
});
</script>
放置自适应网格的移动面板不会自动扩展其高度,要将自适应网格添加到Kendo UI移动应用程序中,请将各个视图的拉伸配置设置为true,然后将100%的高度应用于网格。或者定义一个明确的像素网格高度,并省略面板拉伸选项。
重要提示:在Kendo移动应用程序中使用网格的自适应渲染时,请应用我们Less-based的主题。
下面的示例演示如何应用Stretch选项。
<div id=”foo” data-role=”view” data-init=”onInit” data-stretch=”true”>
<div id=”grid”></div>
</div>
<script>
var gridConfig = {
columns: [
{ field: “name” },
{ field: “age” },
{ command: “destroy” }
],
dataSource: [
{ name: “Jane Doe”, age: 30 },
{ name: “John Doe”, age: 33 }
],
filterable: true,
columnMenu: true,
mobile: “phone”,
height: “100%”
};
function onInit() {
$(“#grid”).kendoGrid(gridConfig);
}
var app = new kendo.mobile.Application();
</script>
下面的示例演示如何应用height选项。
<div id=”foo” data-role=”view” data-init=”onInit”>
<div id=”grid”></div>
</div>
<script>
var gridConfig = {
columns: [
{ field: “name” },
{ field: “age” },
{ command: “destroy” }
],
dataSource: [
{ name: “Jane Doe”, age: 30 },
{ name: “John Doe”, age: 33 }
],
filterable: true,
columnMenu: true,
mobile: “phone”,
height: “140px” //grid will be 140px height
};
$(“#grid”).kendoGrid(gridConfig);
</script>
调整列大小
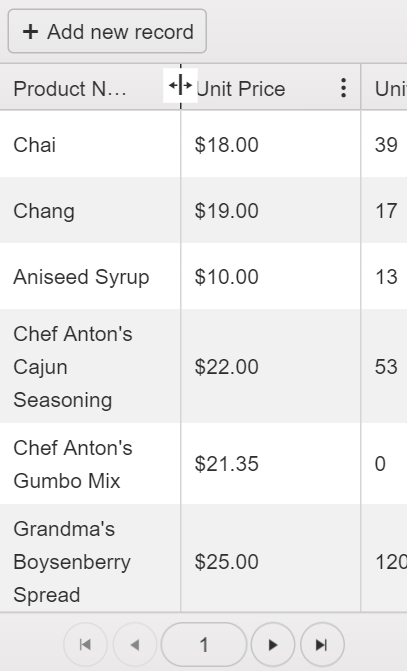
当用户将手指放在相应的列标题上时,将触发触摸屏设备上的列大小调整功能。 当出现调整大小图标时,用户可以通过拖动来调整列的大小。
图1:在移动设备上具有可调整大小的列的网格

在自适应模式下,网格将生成辅助标记,如果要手动销毁小部件,则需要将其删除。
手动销毁网格:
要重新创建Grid,请在最初放置Grid div的同一位置插入一个新的div。
了解最新Kendo UI最新资讯,请关注Telerik中文网!
