发布时间:2021-04-15
Kendo UI for Angular是专业级的Angular UI组件库,不仅是将其他供应商提供的现有组件封装起来,telerik致力于提供纯粹高性能的Angular UI组件,而无需任何jQuery依赖关系。无论您是使用TypeScript还是JavaScript开发Angular应用程序,Kendo UI for Angular都能为Angular项目提供专业的、企业级UI组件。
构建单页应用程序(SPA)很有趣,尤其是当您开始使用Angular时,在这篇文章中,您将学习如何使用Angular轻松实现这一目标。
为了能够继续执行本文的演示,您应该具备以下条件:
ng version
确认您正在使用v12,如果没有,请更新至v12版本。
构建SPA(单页应用程序)的神奇之处之一就是能够拥有多个视图。 使用Angular使此操作非常容易,因为您可以通过导航工具在一个组件中动态显示多个视图。 您可以从主页到“关于”页面,再到“与我们联系”页面,全部集中在一个组件中。
想象一个场景,您从SPA中的一个视图转到另一个视图,但URL完全没有改变。 就像您单击“关于我们”按钮一样,页面显示在DOM中,但URL仍然显示“ newapp.com”而不是“ newapp.com/about”。
这存在一些问题,第一是如何将特定的视图添加为书签,看到书签保存URL而不是应用程序视图?其他问题是由于URL基本上是静态的,刷新页面的概念将如何工作以及如何与其他人共享链接。
路由确保URL与显示的视图匹配,以便您可以轻松地分离视图,保持状态甚至具有直观的Web体验。
Angular Router是由Angular团队构建和维护的JavaScript路由器,它具有广泛的路由包,可让您准确定义要分配给视图的URL字符串。 您可以有多个路由器出口,路径匹配甚至路由防护。 这是Angular重要组成部分,可确保可以使用该框架轻松构建SPA。
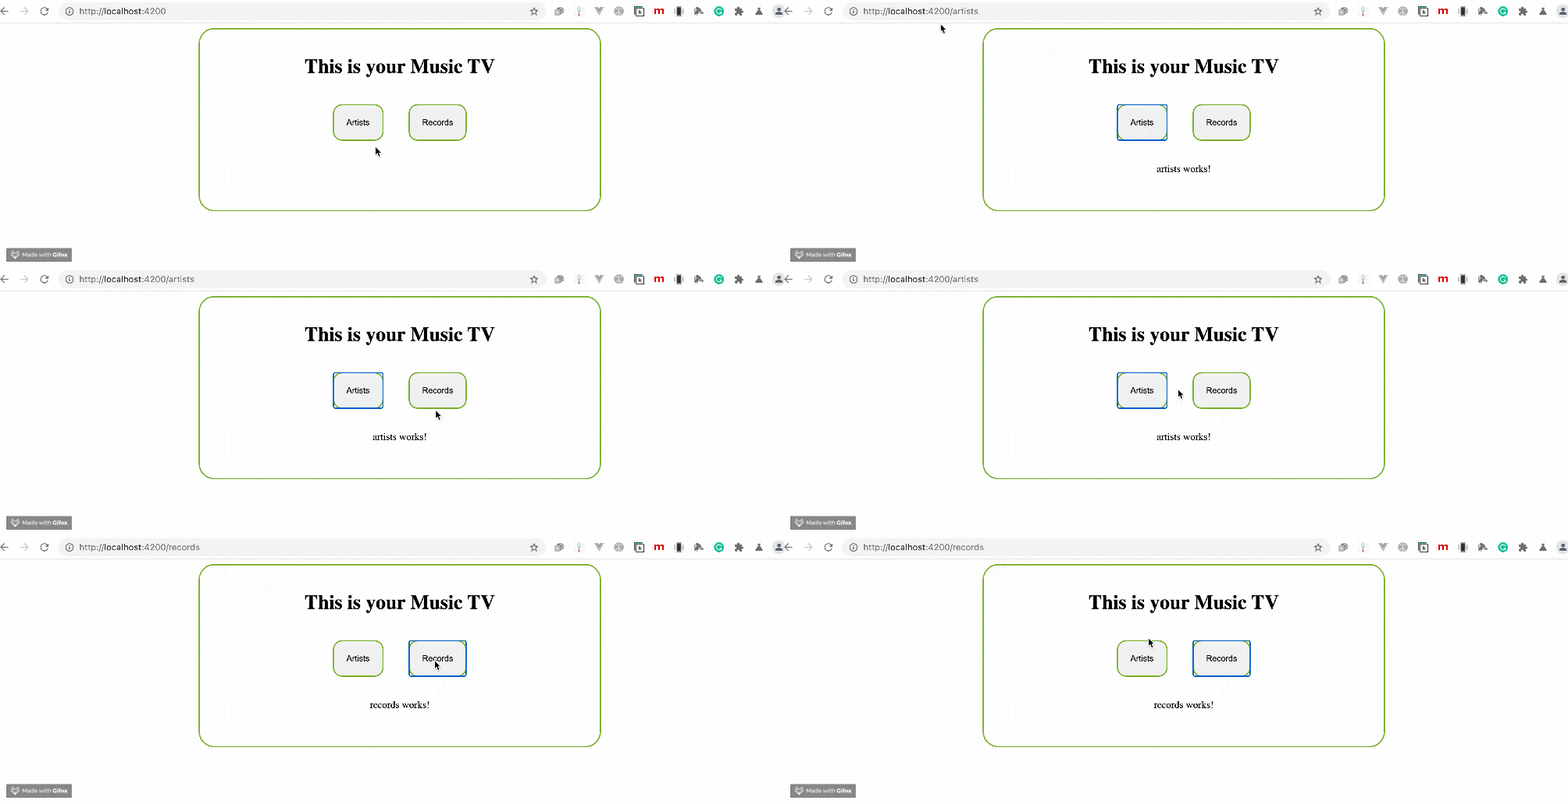
我们将构建一个小型音乐电视应用程序,当您单击连接它们的按钮时,它将显示两个视图,如下所示:

首先,打开VS Code,然后在终端中使用以下命令创建一个新的angular应用程序:
ng new newap –routing
添加路由标记会自动创建一个名为newapp的新Angular应用,并预先配置路由。
现在更改目录,使用以下命令导航到应用程序根文件夹:
cd newapp
接下来要做的是生成新的组件,该组件将容纳计划在其间交替的两个视图。
ng generate component artists -it -is
ng generate component records -it -is
这两个命令会在源代码的应用程序文件夹中使用内联样式和模板创建一个名为Artists and Records的新文件夹,默认情况下类似于Vue.js。 接下来要做的是配置路由以适配我们的需求。
要配置路由器,请将下面的代码块复制到您的app-routing.module.ts文件中:
import { NgModule } from ‘@angular/core’;
import { Routes, RouterModule } from ‘@angular/router’;
import { ArtistsComponent } from ‘./artists/artists.component’;
import { RecordsComponent } from ‘./records/records.component’;
const routes: Routes = [
{path:’artists’, component:ArtistsComponent},
{path:’records’, component:RecordsComponent}
];
@NgModule({
imports: [RouterModule.forRoot(routes)],
exports: [RouterModule]
})
export class AppRoutingModule { }
export const ArrayOfComponents = [ArtistsComponent, RecordsComponent]
首先,导入了两个组件; 然后配置路由。请注意,如何将所需的URL字符串定义为Artists和Records,并将它们与两个组件进行匹配?为了不继续在其他可能需要的地方导入组件,我们创建了一个组件数组。
要注册此新开发项目,请打开您的应用模块文件,然后在下面的代码块中进行复制:
import { BrowserModule } from ‘@angular/platform-browser’;
import { NgModule } from ‘@angular/core’;
import { AppRoutingModule, ArrayOfComponents } from ‘./app-routing.module’;
import { AppComponent } from ‘./app.component’;
@NgModule({
declarations: [
AppComponent,
ArrayOfComponents
],
imports: [
BrowserModule,
AppRoutingModule
],
providers: [],
bootstrap: [AppComponent]
})
export class AppModule { }
在这里我们注册了新的组件数组,如您所见,不再需要将两个组件导入数组中,这是保持代码正确维护的好方法。
接下来要做的是构建应用模板本身,路由器链接是Angular路由器的一部分,用于指示链接 – 当您要指向视图时,它在模板内至关重要。 在应用程序组件HTML文件中,将内容替换为以下代码块:
<div class=”car”>
<div style=”text-align:center;”>
<h1>
This is your Music TV
</h1>
</div>
<nav style=”text-align:center;”>
<button routerLink=’/artists’>Artists</button>
<button routerLink=’/records’>Records</button>
</nav>
<router-outlet></router-outlet>
</div>
当单击 “Artists” 按钮时,将视图更改为Artists组件,并且在单击 “Records”按钮时,也进行了同样的操作。
要向应用添加某种样式以使其突出,请打开应用组件CSS文件并在其中复制以下规则:
.car {
top: 50%;
text-align: center;
border-radius: 25px;
border: 2px solid #73AD21;
padding: 20px;
width: 600px;
height: 250px;
margin-left: 25%;
margin-bottom: 15px;
}
button {
top: 50%;
text-align: center;
border-radius: 15px;
border: 2px solid #73AD21;
width: fit-content;
margin: 20px;
padding: 20px;
}
保存所有这些文件,并使用以下命令在开发服务器上运行该应用程序:
ng serve
您将看到它的运行与上面显示的完全相同。
了解最新Kendo UI最新资讯,请关注Telerik中文网!
