发布时间:2018-01-12
Kendo UI 是基于jQuery 库开发的,Kendo UI widgets是以jQuery 插件形式提供的。这些插件的名称基本上都是以kendo作为前缀。比如 Kendo的autocomplete UI 组件名称为 kendoAutoComplete ,Kendo UI 手机 UI组件是以 “kendoMobile?为前缀。比如:?kendoMobileListView?.
Kendo UI组件使用页面上HTML元素来创建,使用CSS选择器 然后调用jquery插件(kendo UI组件)将这些HTML元素转换为Kendo UI组件(基本方法和jQuery UI类似)。
例如:初始化一个自动提示输入框组件(autocomplete)
<input id=“autocomplete” />
<script>
$(“#autocomplete”).kendoAutoComplete([“Apples”, “Oranges”, “Grapes”]);
</script>
其中 $(?#autocomplete?).kendoAutoComplete([?Apples?, ?Oranges?, ?Grapes?]); 完成两项任务:
注意:如果jQuery 找不到由css 选择器指定的HTML元素,Kendo UI组件不会被创建,你可以使用任意合法的CSS选择器来初始化Kendo UI组件,对于每个符合选择器条件的HTML元素都会初始化一个Kendo UI组件。
如前面例子,可以通过传递配置对象的方法来配置Kendo UI组件,配置对象为一组Key/Value对,这些Key/Value值用来配置UI组件。
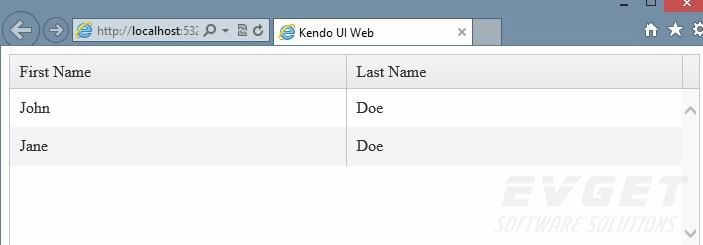
如下例,配置一个Grid组件。
<div id=“grid”></div>
<script>
$(“#grid”).kendoGrid({
height: 200,
columns:[
{
field: “FirstName”,
title: “First Name”
},
{
field: “LastName”,
title: “Last Name”
}
],
dataSource: {
data: [
{
FirstName: “John”,
LastName: “Doe”
},
{
FirstName: “Jane”,
LastName: “Doe”
}
]
}
});
</script>
上面例子为Grid组件配置了height, columns和dataSource. API 文档 包含了每个Kendo UI 组件支持的配置项。

Kendo UI 通过jQuery 插件的方式来初始化,但是调用这些方法时不会返回这些实例对象的引用,而是使用传统的jQuery 方法来获取所创建的Kendo UI对象的引用,为了获得所创建的Kendo UI组件对象的引用,使用jQuery data方法,例如获取前面例子中创建kendoAutoComplete的对象,可以使用下面代码:
<input id=“autocomplete” />
<script>
$(“#autocomplete”).kendoAutoComplete([“Apples”, “Oranges”, “Grapes”]);
var autocomplete = $(“#autocomplete”).data(“kendoAutoComplete”);
</script>
方法 $(?#autocomplete?).data(?kendoAutoComplete?) 返回所创建的Kendo AutoComplete对象。data的参数为Kendo UI组件的名称,比如?kendoAutoComplete?, ?kendoGrid?等。
在获取Kendo UI组件对象的引用之后,就可以调用该UI组件的方法,例如:
<input id=“autocomplete” />
<script>
$(“#autocomplete”).kendoAutoComplete([“Apples”, “Oranges”, “Grapes”]);
var autocomplete = $(“#autocomplete”).data(“kendoAutoComplete”);
autocomplete.value(“Cherries”);
var value = autocomplete.value();
alert(value); // Displays “Cherries”
</script>
上面的例子中获取autocompete对象之后,调用了它的value()方法来写入和读取该输入框的内容。
Kendo UI组件支持多种事件,比如按键,鼠标,内容变化等事件,有两种方法可以为Kendo Ui 组件定义事件处理方法:
比如,初始化时定义事件处理方法:
<input id=“autocomplete” />
<script>
function autocomplete_change() {
// Handle the “change” event
}
$(“#autocomplete”).kendoAutoComplete({
change: autocomplete_change
});
</script>
下面例子,使用bind方法。
<input id=“autocomplete” />
<script>
function autocomplete_change() {
// Handle the “change” event
}
$(“#autocomplete”).kendoAutoComplete();
var autocomplete = $(“#autocomplete”).data(“kendoAutoComplete”);
autocomplete.bind(“change”, autocomplete_change);
</script>
两种方法都把一个函数绑定到autocomplete的?change?事件。此时如果autocomplete内容发生变化,则触发change事件,相应的事件处理方法会被调用。
事件处理函数在事件发生时被调用,该事件处理函数的传入参数包含了事件相关的JavaScript对象,你可以通过sender参数获得触发该事件的UI组件,比如:
<input id=“autocomplete” />
<script>
function autocomplete_change(e) {
var autocomplete = e.sender;
var value = autocomplete.value();
alert(value); // Displays the value of the AutoComplete widget
}
$(“#autocomplete”).kendoAutoComplete({
change: autocomplete_change
});
</script>
此外,也可以使用this 关键字来获取触发事件的UI对象引用,比如:
<input id=“autocomplete” />
<script>
function autocomplete_change(e) {
var autocomplete = this;
var value = autocomplete.value();
alert(value); // Displays the value of the AutoComplete widget
}
$(“#autocomplete”).kendoAutoComplete({
change: autocomplete_change
});
</script>